Tech,Space,Gaming, and Science Fiction News to wet your whistle
USB Image Tool for Windows easily backs up and restores your complete VMware ESXi hypervisor on USB or SD drives, a simple and free way to clone for peace of mind before upgrading
Get link
Facebook
X
Pinterest
Email
Other Apps
I created the video below that features a very detailed walk-through of an imaging process that seems to work quite well for me. I tested this heavily when tinkering with various vSphere 6.5 and 6.7 versions in my home lab. While the use of such an tool isn't suited for production server use because it's completely unsupported by VMware, I have found it to be invaluable for lab testing purposes, giving me complete peace of mind that I can avoid long troubleshooting sessions by merely restoring from a complete backup image, much like I do with my Windows and Linux PCs and VMs.
It only takes a few minutes to install ESXi from scratch, but it's the configuration afterward that takes longer, including networking. You can back up the entire configuration of your ESXi server using VMware's official way in KB 2042141, but that doesn't grab your ESXi boot files and any custom VIBs. What about a more thorough way, that handles both the files and the configuration, and is easy to use?
Some scripted configuration backup methods assume a full vSphere, with vCenter or VCSA installed and configured. Not every home lab has that, and some are just a standalone ESXi hosts. This article has you covered.
Let me think this through with you. How about a way to get peace-of-mind, knowing for darn sure that you can roll back an upgrade gone wrong? The basic steps of what's detailed below involve creating a backup image of your known-good USB (or SD) drive where your working ESXi lives, label it, and set it aside. Next, restore from that backup to another USB drive, and label it. Now boot it up on the same server that was imaged. It works! Now upgrade it. If that upgrade to a later ESXi point release or patch level doesn't work out well for you, it's just your copy of ESXi that you've scrogged. No worries, you still have the original USB drive, don't you? Even if you lost the physical original USB "thumb" drive, you still have the image on your Windows system's drive! Get it? Now that's peace of mind.
Warning
Using the cloned image on a different system than it came from will likely lead to networking strangeness, even IP conflicts and/or packet loss. Thus, the importance of good labeling, to indicate the exact system you took the backup from. Also, if the ESXi host you're thinking of cloning is a member of a cluster, this cloning technique in this article should work, but I have not fully tested this. The host and the cluster shouldn't notice any change in the "personality" of the booted server, with all the same drivers and networking and such intact, since it's an exact drive image.
Windows system with 1 available USB port, USB 3.0 preferred. If you're using SD, a built-in SD reader, or a USB based SD reader. Substitute the word SD for all instances of USB in the instructions below.
VMware ESXi installed on an SD or USB drive. Any version of ESXi is fine, even the free version, so there's no assumption that you have vCenter/VCSA running
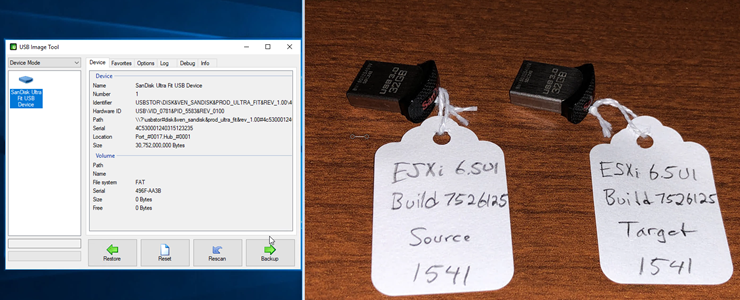
make note of your ESXi Build Number from ESXi client or vSphere Client, and use a pencil to write it on a blank or erased label tag, including the word SOURCE, and write identical information on a second blank or erased label tag, but instead of SOURCE, write TARGET
shut down your ESXi host you'd like to back up, such as right before doing an easy upgrade to 6.7Click the image above to donate the author of the USB Image Tool.
attach the label to USB drive on the system you just shut down
Move the SOURCE to your Windows system
Launch USB Image Tool, and following along with the video below. You may want to jump to the exact spot where I launch USB Image tool.
First you'll create an image of your SOURCE drive that gets saved to your internal drive.
Then you'll restore from that image to your TARGET drive.
Free-will donate to the author of USB Image Tool. I happily gave him €50 EUR, about $62 USD, because this dude is talented and certainly deserves some support. There is nothing out there quite like what he has created.
ODIN - Free Disk Imager Exception of type Internal Exception thrown, cause: The partition format of this drive is not support (only MBR format, no EFI)
SD Imager This tool is used for writing drive images to USB sticks or SD cards
USB Image Tool Works great, but I did get this error once:
Error! Could not write to the USB device (Code: 5)! Please close all open explorer windows for this device. Access is denied. I believe I mention this during the video, along with the work-around.
If you're running Linux or willing to boot from a live Linux distro, you have many choices including CloneZilla, which is essentially a dd copy. Virtual Hobbit and Andreas Peetz apparently had good luck with it:
Reader feedback is invaluable for an article like this. If you find something lacking or wrong in my instructions, please let me know by dropping a comment below, which really helps everybody out, and I can even correct the article where needed. Thank you!
By Liam McCabe This post was done in partnership with Wirecutter . When readers choose to buy Wirecutter's independently chosen editorial picks, it may earn affiliate commissions that support its work. Read the full article here . After six summers of researching, testing, and recommending window air conditioners, we've learned that quiet and affordable ACs make most people the happiest—and we think the LG LW8016ER will fit the bill in most rooms. This 8,000 Btu unit cools as efficiently and effectively as any model with an equal Btu rating, and runs at a lower volume and deeper pitch than others at this price. Little extra features like a fresh-air vent, two-axis fan blades, and a removable drain plug help set it apart, too. The LG LW8016ER is a top choice for an office or den, and some people will find it quiet enough for a bedroom, too. If our main pic...
Pre-loaded cartridges of cannabis concentrate are currently among the most popular means of consumption, and for good reason. They're discreet to use and easy to handle, a far cry from the dark days of 2016 when we had to dribble hash oil or load wax into narrow-mouthed vape pens by hand. But, frustratingly, an ever increasing number of oil cartridge manufacturers employ one-off design standards so that their products won't work with those of their competitors, thereby locking customers into proprietary ecosystems. We've already seen this with nicotine vaporizers -- which has a seen a massive rise in "pod systems" in the last few years, each outfitted with a unique canister and battery built to be incompatible with those of their competition. Is it too late for the burgeoning cannabis industry to set a universal standard for their product designs? ...
Currently priced at: 14.69 via https://ift.tt/HzrCcJa May 4, 2022 at 07:00PM Manage Unsubscribe from these notifications or sign in to manage your Email service. ...


Comments
Post a Comment